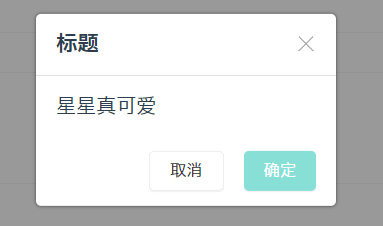
Vue3造轮子(三)-Dialog组件

效果预览

代码链接

提交历史

API设计

需求

  • 点击后弹出 – v-model:visible
  • 有遮罩层 overlay,可控制点击遮罩层是否关闭 – closeOnClickOverlay
  • 有 close 按钮
  • 有标题,支持自定义标题 – title / slot=”title”
  • 有内容 ,支持自定义内容 – content / slot=”content”
  • 有 确认 / 取消 按钮,同时支持确认 / 取消事件 – onConfirm / onCancel
  • 支持异步关闭
  • 支持组件式调用,也支持函数式调用 – 动态挂载组件
  • 可以指定挂载节点 – getContainer

用户怎么用该组件

组件调用

1
2
3
4
5
6
7
8
9
<x-dialog 
visible
title="标题"
content="内容太"
:onConfirm="fn1"
:onCancel="fn2"
>
</x-ialog>

函数式调用

1
2
3
4
5
6
7
8
9
10
11
12
setup() => {
const showDialog = () => {
openDialog({
title: '标题',
content: '嗨 小星星',
onConfirm:() => {},
onCancel:() => {},
closeOnClickOverlay: false
})
}
return { showDialog }
}

Vue3笔记

Teleport

参考文档

Dialog组件使用fixed定位,如果将其嵌套在某个组件内部,很可能会产生嵌套组件定位层级问题,处理起来会比较麻烦。因此,需要将模板渲染的位置与组件逻辑剥离开来。vue3提供了一个非常方便的新特性——teloport,可以理解为传送门,允许我们控制在 DOM 中哪个父节点下呈现 HTML。

基本使用

teleport接受两个属性:

to - string

Dialog组件为例:

1
2
3
4
5
6
7
8
9
10
11
12
13
14
15
16
17
18
19
20
21
22
<Teleport to="#app">
<div class="xx-dialog-overlay" @click="onClickOverlay"></div>
<div class="xx-dialog-wrapper">
<div class="xx-dialog">
<header :class="{ 'title': title || $slots.title }">
<div v-if="$slots.title" class="title-slot">
<slot name="title"></slot>
</div>
<span v-else>{{ title }}</span>
<span class="xx-dialog-close" @click="close"></span>
</header>
<main>
<slot v-if="$slots.content" name="content"></slot>
<div v-else>{{ content }}</div>
</main>
<footer>
<x-button size="small" @click="onCancel">取消</x-button>
<x-button size="small" theme="primary" @click="onConfirm">确定</x-button>
</footer>
</div>
</div>
</Teleport>

效果演示:

可以看到通过to属性,指定该组件挂载到了<div id="app"></div>中。

注意

  • to属性传入的值必须是有效的查询选择器或 HTMLElement

    1
    2
    3
    4
    5
    6
    7
    8
    <!-- 正确 -->
    <teleport to="#some-id" />
    <teleport to=".some-class" />
    <teleport to="[data-teleport]" />

    <!-- 错误 -->
    <teleport to="h1" />
    <teleport to="some-string" />
  • 默认挂载到第一个选择的元素

    1
    2
    3
    4
    <div class="container">container1</div>
    <div class="container">container2</div>

    <teleport to=".container"></teleport>

挂载到第一个.container

disabled-boolean

此可选属性可用于禁用 teleport 的功能,这意味着其插槽内容将不会移动到任何位置,而是在您在周围父组件中指定了 teleport 的位置渲染。

与 Vue components 一起使用

如果 teleport 包含 Vue 组件,则它仍将是 teleport 父组件的逻辑子组件,仍接收父组件传来的属性。

h() 渲染函数

如果想要实现函数式调用Dialog组件,则需要通过渲染函数实现该组件的动态挂载。Vue2中的渲染函数createElement(),而在Vue3中被称为h(),用于创建虚拟节点(更准确地命名为createVNode(),出于频繁使用和简洁的目的,改为了h())。

h()同样接受三个参数:

1
2
3
4
5
6
7
8
9
10
11
12
13
14
15
16
17
18
19
20
21
22
23
24
25
26
27
28
29
30
// @returns {VNode}
h(
// {String | Object | Function | null} tag
// 一个 HTML 标签名、一个组件、一个异步组件,或者 null。
// 使用 null 将会渲染一个注释。
//
// 必需的。
'div',

// {Object} props
// 与 attribute、prop 和事件相对应的对象。
// 我们会在模板中使用。
//
// 可选的。
{},

// {String | Array | Object} children
// 子 VNodes, 使用 `h()` 构建,
// 或使用字符串获取 "文本 Vnode" 或者
// 有 slot 的对象。
//
// 可选的。
[
'Some text comes first.',
h('h1', 'A headline'),
h(MyComponent, {
someProp: 'foobar'
})
]
)

实际应用如下:

1
2
3
4
5
6
7
8
9
10
11
12
13
14
15
16
17
18
19
20
21
22
23
24
25
26
27
28
29
30
31
32
33
34
35
36
37
38
39
import XDialog from '../Dialog.vue'
import { createApp, h } from 'vue'

export const openDialog = ({
title = '',
content = '',
onConfirm = () => {},
onCancel = () => {},
closeOnClickOverlay = true
}) => {
const div = document.createElement('div')
document.body.appendChild(div)
const close = () => {
app.unmount()
div.remove()
}
const app = createApp({
render() {
return h(
XDialog,
{
visible: true,
title,
content,
onConfirm,
onCancel,
closeOnClickOverlay,
'onUpdate:visible':(newVisible) => {
if (!newVisible) {
close()
}
}
}
)
}
})
app.mount(div)
}

总结

  • teleport指定挂载节点
  • h()动态挂载组件